
Table of Contents

Introduction
Python is one of the most popular programming languages used for developing web applications, APIs, automation tools, and machine learning applications. As a hosting company, we provide Python support directly through cPanel, allowing developers to deploy Python web applications without managing a VPS or dedicated server.
Note: If developers and users wish to host their resource-intensive Python application, we strongly advise them to select VPS (Virtual Private Server) because it provides dedicated resources, greater control, and better performance for applications with higher CPU or memory requirements.
This article will teach you how to set up a Python application in cPanel, explain the meaning of each setting, and solve typical deployment problems.
Prerequisites
Before deploying your application, make sure you have:
- A hosting account with python support
- Access to cPanel
- SSH access (recommended)
- Python application
- requirements.txt
- WSGI entry file (passenger_wsgi.py)
- Virtual environment (created automatically by cPanel)
- Internet access to install dependencies
How Python Works in cPanel
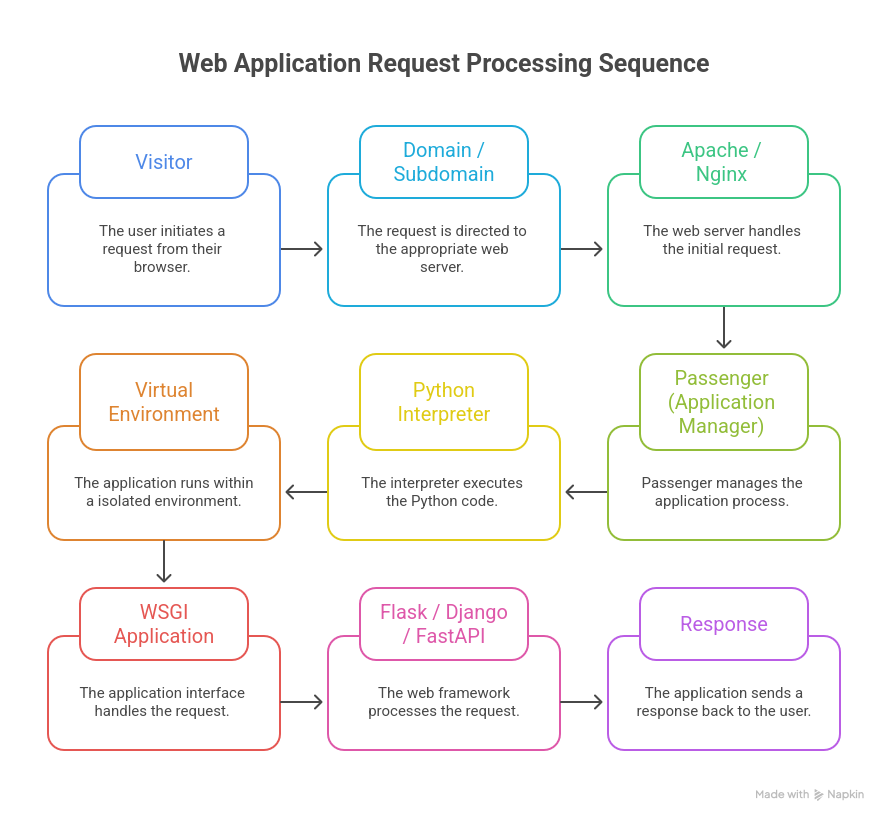
Unlike PHP applications that execute on every request, Python applications are executed through Passenger (mod_passenger), which loads the Python interpreter, activates the application’s virtual environment, loads the WSGI application, and forwards incoming HTTP requests to it.
Execution flow of python Application in cPanel
Let’s understand the full execution flow of a Python application in cPanel.
When a visitor accesses the website, the request first reaches the domain or subdomain and is then forwarded to the Apache or Nginx web server. The web server passes the request to Passenger (Application Manager), which activates the application’s Python virtual environment (if it is not already active), loads the configured WSGI application using the selected Python interpreter, and executes the Python application (such as Flask or Django). The application processes the request, generates the appropriate response, and returns it through Passenger and the web server back to the visitor.
For a clearer understanding of the Python application execution flow, we’ve attached a diagram below that illustrates how a Python application is executed in cPanel.
Deployment Steps
Create a Subdomain (Recommended)
Although you can deploy your Python application on your primary domain, it is recommended to use a subdomain to keep your application files organized and isolated from your main website.
For example:
python.example.com or api.example.com
To create a subdomain, follow the steps below.
Log in to cPanel
Log in to your cPanel account using any of the following URLs:
- cpanel.example.com
- example.com/cpanel
- example.com:2083
Note: If you are using Cloudflare and your domain’s A or CNAME records are set to Proxied, you may not be able to access your cPanel login page using the second and third URLs. This is because the requests are routed through Cloudflare’s proxy network instead of reaching your hosting server directly. In such cases, use the cpanel.example.com hostname (if configured by your hosting provider) or temporarily disable the proxy for the relevant DNS record while accessing cPanel.
Open the Domains Interface
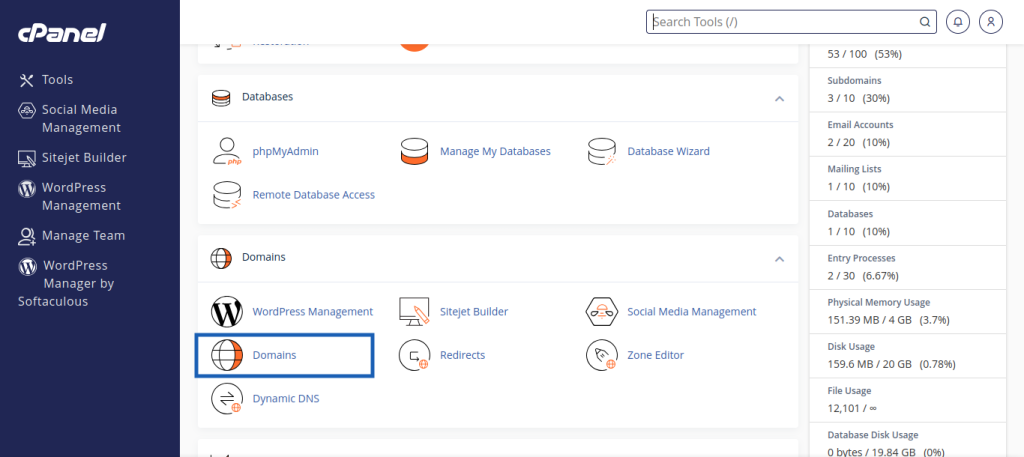
Navigate to Domains under the Domains section of cPanel. Alternatively, you can search for Domains using the cPanel search bar. Once the Domains tool appears, click it to open the domain management interface, as shown in the figure below.
Create a New Domain
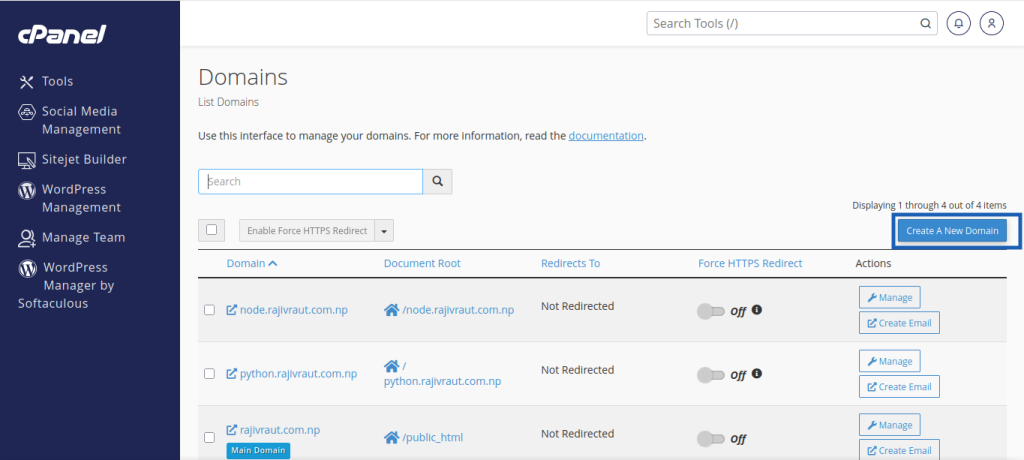
After opening the Domains interface, you will be redirected to the Domains page. Click the Create a New Domain button (as highlighted in the figure below). This will open the Create a New Domain page, where you can configure your new subdomain.
Configure the Subdomain
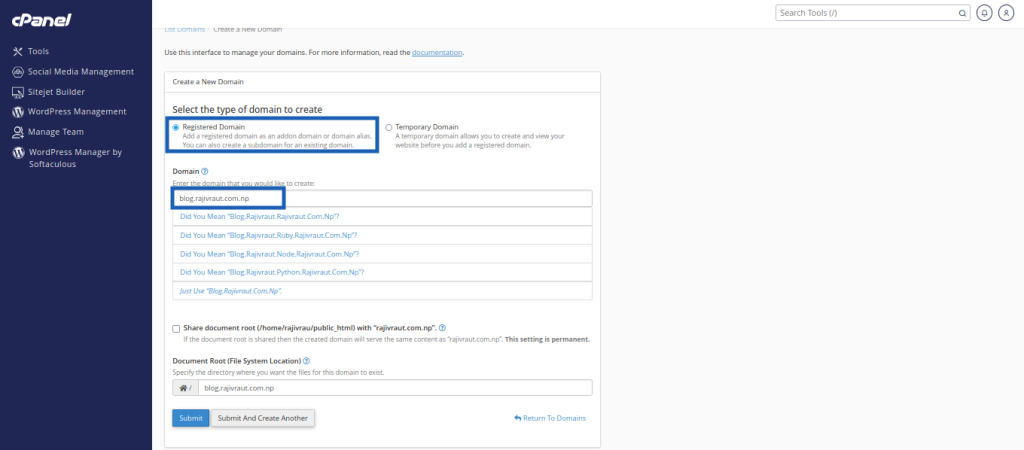
On the Create a New Domain page, select the Registered Domain option if you have already connected your domain to your cPanel account. If your domain has not yet been connected, you can select the Temporary Domain option for testing purposes.
Note: Select the Temporary Domain option only when you want to test your website or application. It is intended solely for testing and should not be used for production hosting.
Next, perform the following steps:
- Enter your preferred subdomain in the second highlighted field. For example:
- blog.example.com
- python.example.com
- Choose the Document Root for your subdomain. Below the domain field, you’ll notice a checkbox that allows your subdomain to share the public_html directory with your primary domain.
- If you do not want your subdomain to share the public_html directory with the primary domain, leave the Share document root checkbox unchecked (Recommended).
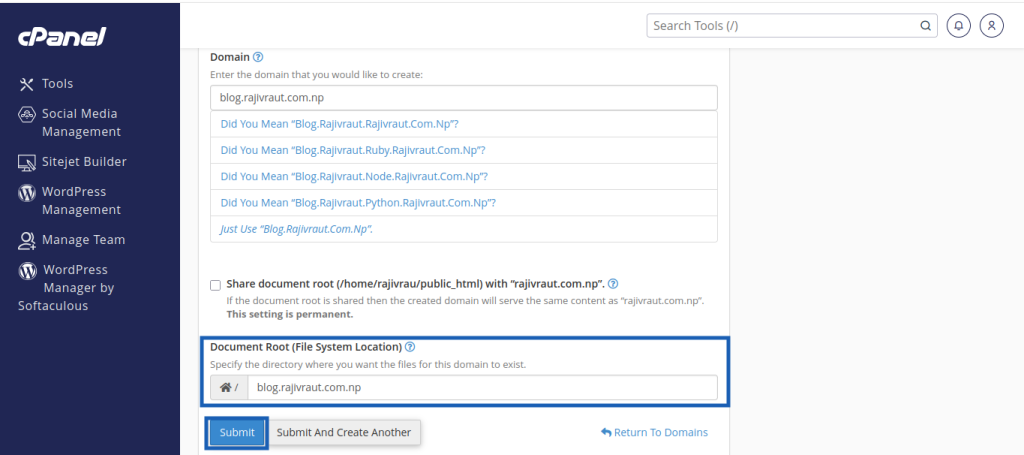
Note: If you leave the Share document root checkbox unchecked, cPanel will allow you to specify a separate Document Root (File System Location) for your subdomain. In most cases, you can simply leave the automatically generated path unchanged.
Create the Subdomain
Finally, click the Submit button (as highlighted in the figure below). Once the process completes successfully, your subdomain will be created and added to your cPanel account, making it ready for hosting your Python application.
Upload your Project
Upload your project using one of the following methods:
- cPanel’s File Manager
- FTP (File Transfer Protocol)
- WebDisk
- Git
For demonstration purposes, we’ll use cPanel’s File Manager to upload the project. However, you are free to choose any of the above-mentioned methods based on your preference.
Open File Manager
Search for File Manager using the cPanel search bar and open it. You will be redirected to the File Manager interface.
Navigate to the Document Root and Upload the Project
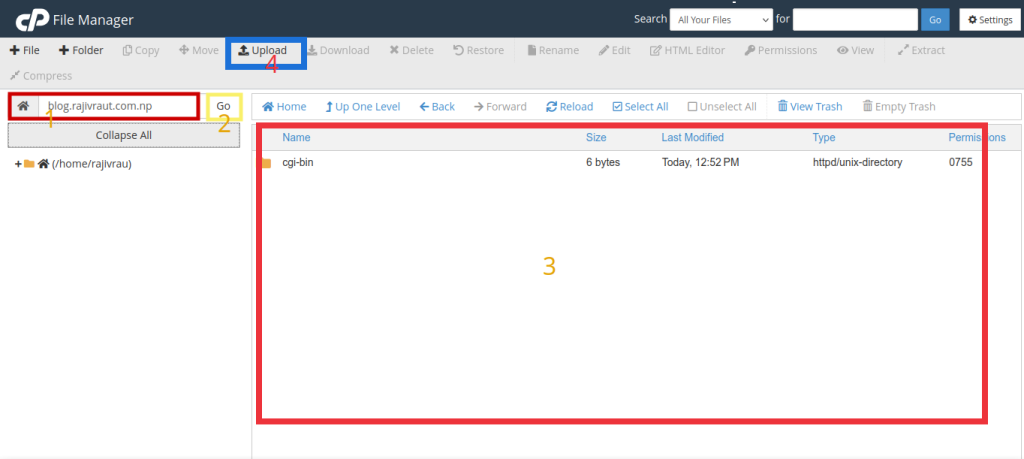
Enter your subdomain’s document root in the search box and click the Go button. This will open your subdomain’s document root directory on the right side of the File Manager interface.
At the top of the interface, click the Upload button. You will then be redirected to the upload interface, where you can upload your project’s files or ZIP archive.
Upload the Project Files
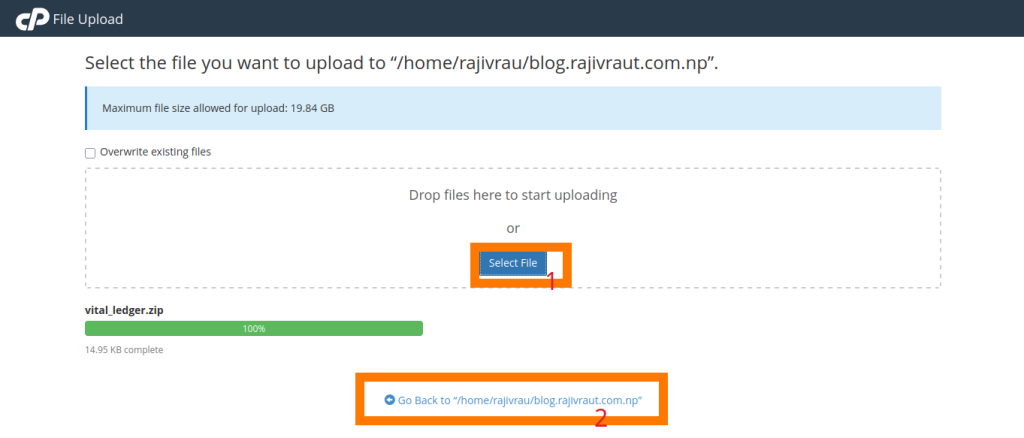
In the upload interface, click the Select File button and choose your project files from your local computer. You can either upload the individual project files or upload your project as a ZIP archive.
After the upload has completed successfully, click the Go Back to “/home/hostname/subdomain” button. You will be redirected to your subdomain’s document root directory in the File Manager.
Extract the Project Files
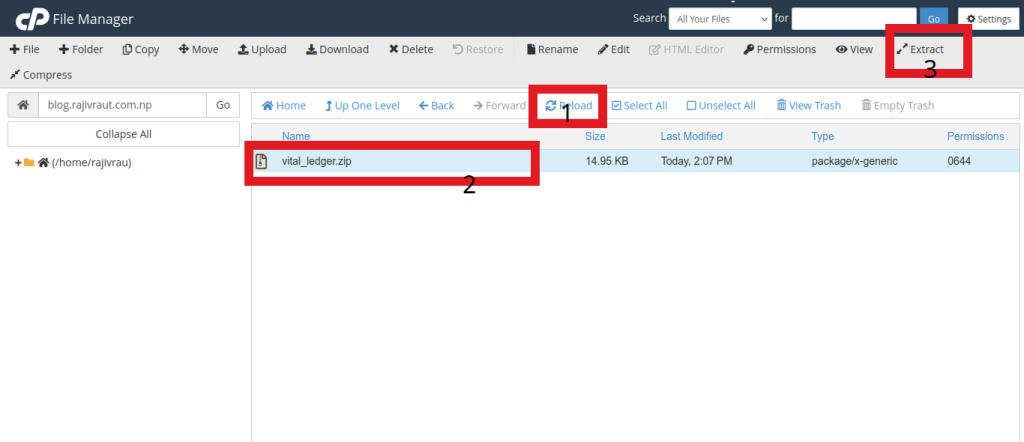
After returning to your subdomain’s document root directory, you may not immediately see the uploaded project file. This is normal.
Simply click the Reload button, and the uploaded file will appear in the directory listing. Next, single-click the uploaded ZIP archive to select it, and then click the Extract button on the toolbar to extract its contents.
Remove the ZIP Archive (Optional)
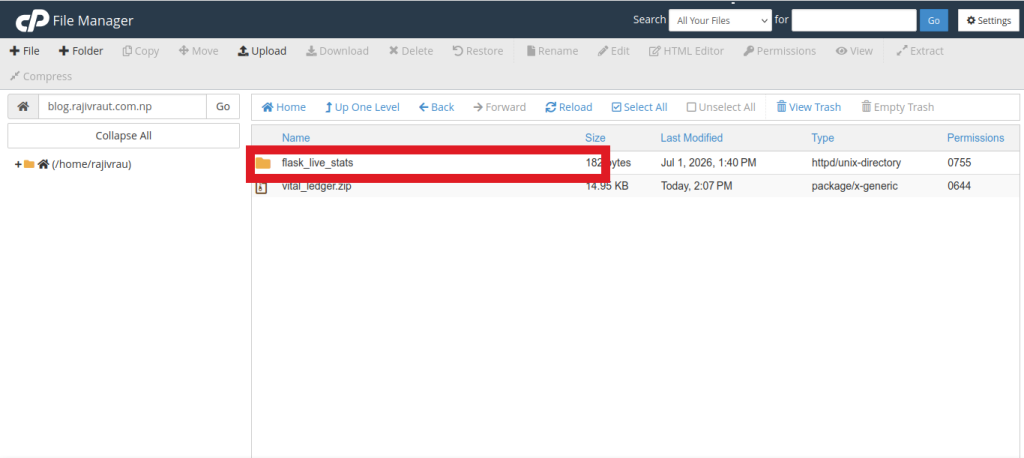
After successfully extracting the ZIP archive, your project’s directory will be created. If you no longer need the uploaded ZIP file, you can delete it to free up disk space.
To do so, select the ZIP archive and click the Delete button on the toolbar.
Move the Project Files to the Document Root
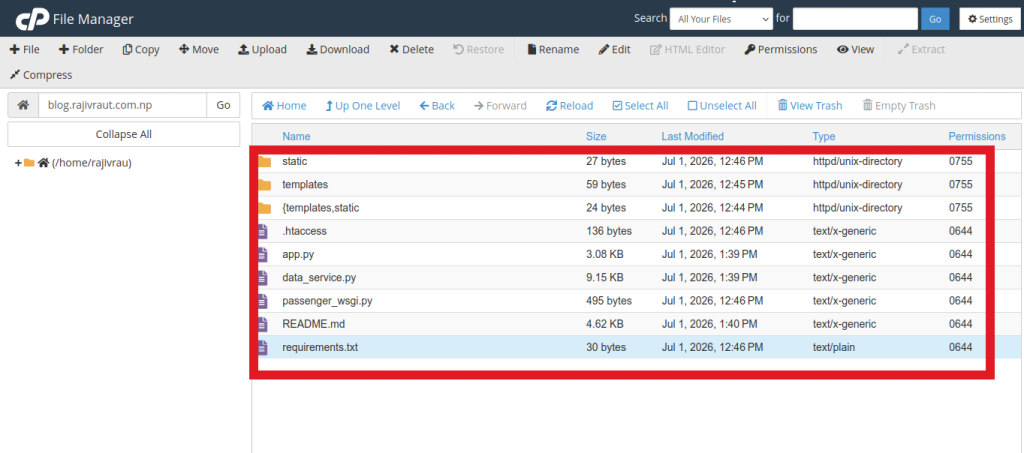
Open the extracted project directory, click the Select All button to select all the files and folders, and then click the Move button on the toolbar. This will open a dialog box prompting you to specify the destination where you want to move the selected files.
In the destination field, enter your subdomain’s document root directory. For example:
subdomain.example.com/
Then click the Move Files button.
Once the move operation is complete, all your project files will be located directly inside your subdomain’s document root directory, making them ready for deployment.
Setting Up the Python Application
Open the Setup Python Application Interface
Navigate to Setup Python App from the Software section of cPanel, or simply search for Python App using the cPanel search bar and open it.
Create a New Python Application
In the Setup Python App interface, you’ll notice two main sections:
- Create Application
- Already Created Python Applications, which displays information about previously created applications, including their Application URI, Python Version, Mode, Status, and available Actions.
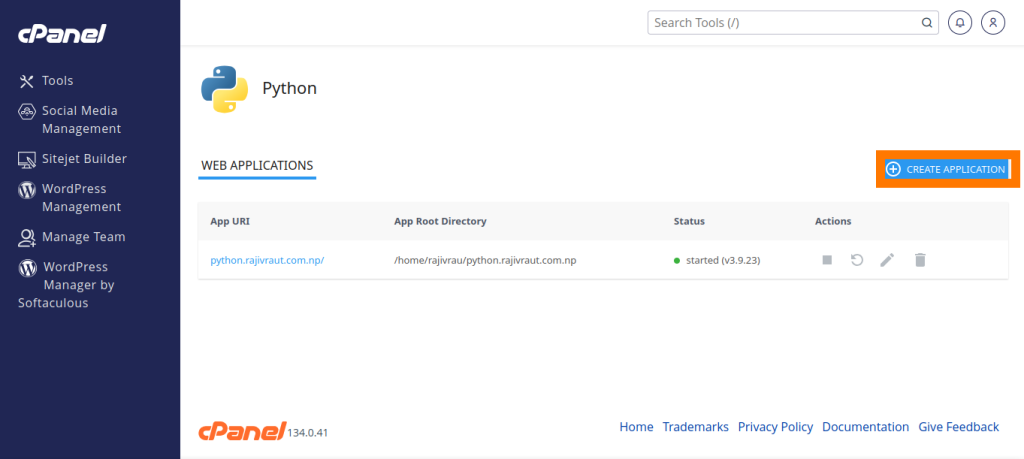
To create a new Python application, click the Create Application button (as highlighted in the figure below). You will be redirected to the Create Python Application interface, where you can configure your application’s settings.
Setting Up the Python Application
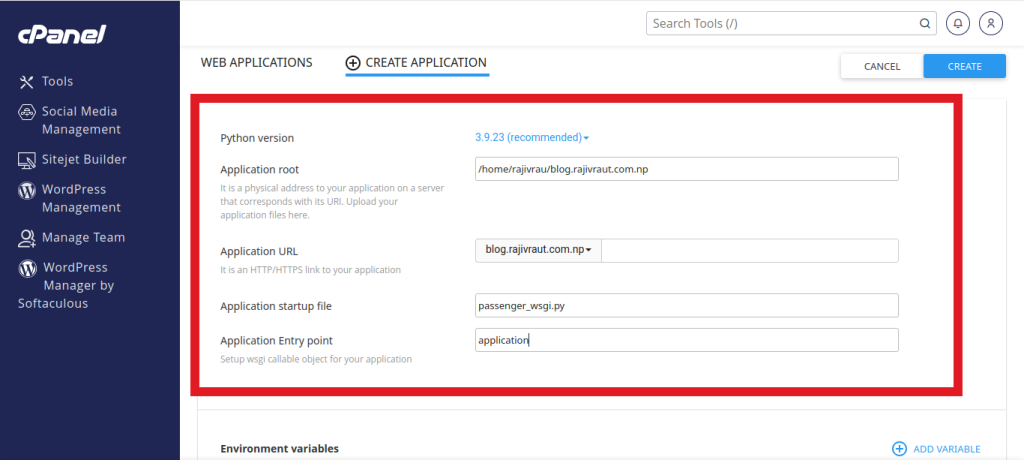
In the Create Python Application interface, fill in all the required information in their respective fields.
- Python Version: Select the Python version required by your application. It is recommended to use the latest supported stable version unless your application requires an older version for compatibility.
- Application Mode: You can either select Development mode or Production mode depending on your requirements. Development mode is suitable for testing and debugging, whereas Production mode is recommended for hosting live applications.
- Application Root: In this field, specify the directory containing your Python application files. Although the application can be placed inside the subdomain’s document root, it is generally recommended to keep it outside the public web directory. For example:
/home/username/pythonapp
or
/home/username/apps/blog
Keeping the application outside the public web directory helps protect source files such as .env, requirements.txt, passenger_wsgi.py, and other configuration files from accidental exposure due to web server misconfiguration.
- Application URL: In this section, you’ll find a selection box containing all the domains and subdomains connected to your cPanel account, along with a textbox that allows you to specify the directory from which you want to serve your Python application.
For example:
blog.example.com/python
Considering the above URI, you can select blog.example.com from the selection list and enter /python in the textbox beside the domain selection.
Note: For beginners, placing the application inside the subdomain’s document root may simplify understanding and deployment. However, for improved security, it is recommended to store the application outside the public web directory and map it to the desired domain or subdomain using the Application URL.
- Application Startup File: This field specifies the application’s startup file. When a Python application is created through cPanel, Passenger automatically generates a file named passenger_wsgi.py, which serves as the entry point to your application. In most cases, you only need to modify this file so that it imports and loads your WSGI application correctly.
A sample passenger_wsgi.py file for a Flask application is shown below:
import sys

import os

sys.path.insert(0, os.path.dirname(__file__))

from app import app as application
If you are deploying a Django application, the passenger_wsgi.py file may look similar to the following:
import os

os.environ.setdefault(

    "DJANGO_SETTINGS_MODULE",

    "mysite.settings"

)

from django.core.wsgi import get_wsgi_application

application = get_wsgi_application()
Unlike Node.js applications, Python applications deployed through Passenger do not need to listen on a specific port. Passenger automatically communicates with the WSGI application and handles all incoming HTTP requests. Therefore, your application should not bind to a port when deployed through cPanel.
Note: The cPanel Python Application Manager does not automatically load environment variables from a .env file. Instead, define environment variables using the Add Variable option available in the Create Python Application interface. Alternatively, if your application uses a .env file, you can load it manually using a package such as python-dotenv, if supported by your application.
To add an environment variable, click the Add Variable button and provide the following information:
- Name: Enter the name of the environment variable. It should exactly match the variable name referenced in your application’s source code.
- Value: Enter the value corresponding to the environment variable.
Click the Done button to save the environment variable. Repeat the same process for any additional variables required by your application.
Finally, click the Create button to create your Python application in cPanel.
Installing Python Dependencies
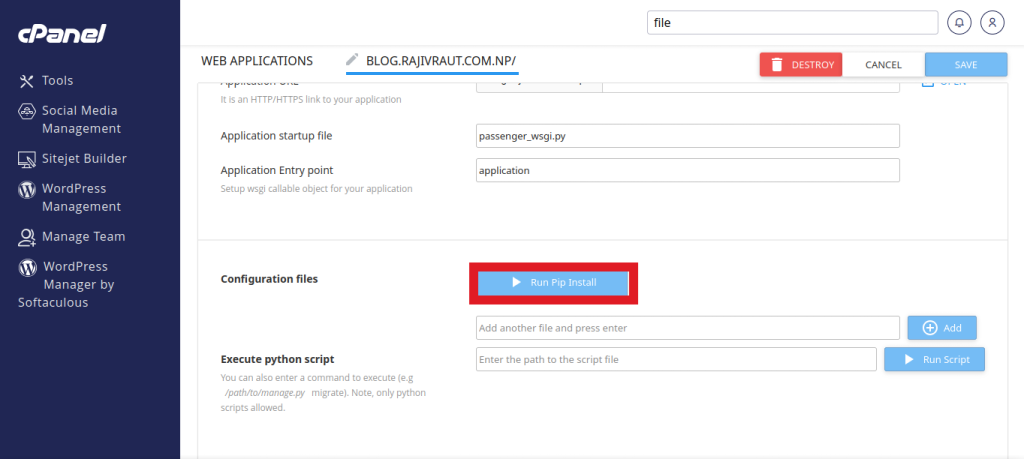
After creating the application, you’ll notice that the Run Pip Install button has been enabled (provided that cPanel detects the requirements.txt file in the configured Application Root). Click the Run Pip Install button to install all the Python packages required by your application.
Note (For Advanced Users): If the Run Pip Install button remains disabled or the requirements.txt file is not detected automatically, cPanel provides a command for activating the application’s virtual environment. Copy the command, open the Terminal in cPanel, and paste it to activate the virtual environment. Then navigate to your application’s root directory and manually install the required dependencies by running:
pip install -r requirements.txtThis command installs all the Python packages listed in the requirements.txt file into your application’s virtual environment.
Note (Only for Advanced Users): If the requirements.txt file is not detected automatically by cPanel or the Run Pip Install button remains disabled, cPanel provides a command to activate your application’s virtual environment. Copy the command, open the Terminal in cPanel, and paste it to activate the virtual environment. Once activated, navigate to your application’s root directory and manually install the required dependencies using:
pip install -r requirements.txt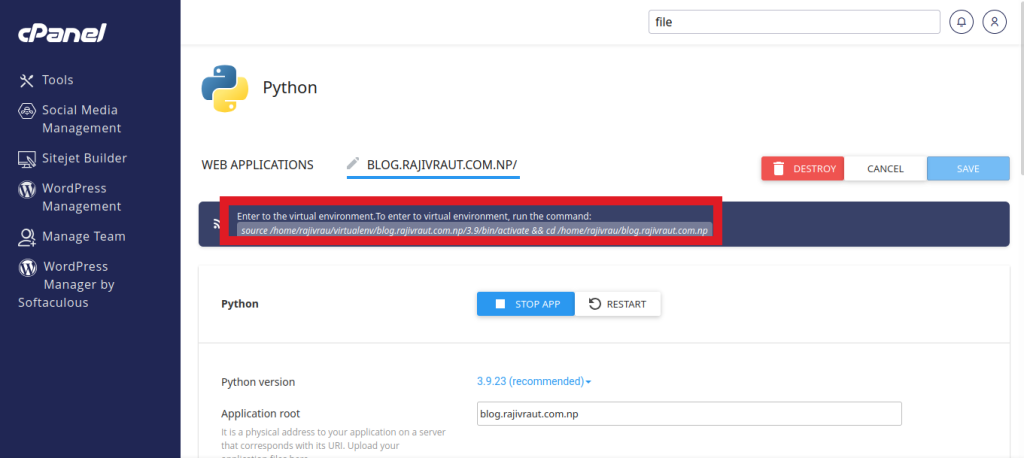
Starting the Python Application
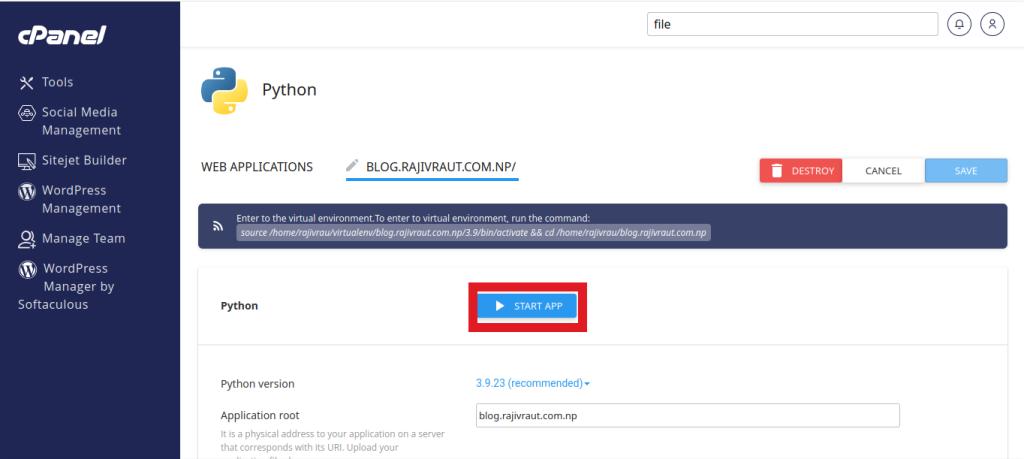
After the package installation completes successfully, click the Start button to start your Python application. Passenger will initialize the application’s virtual environment, load the configured passenger_wsgi.py file, and launch the application.
Once the application has started successfully, its status will change to Running, indicating that it is ready to serve requests from visitors.
Verifying the Application
After the application has been started successfully, open the configured Application URL in your web browser to verify that the application is running correctly.
If the application loads as expected, your Python application has been deployed successfully. If you encounter any errors, review the application’s stderr.log file and verify that all required dependencies, environment variables, and application settings have been configured correctly.
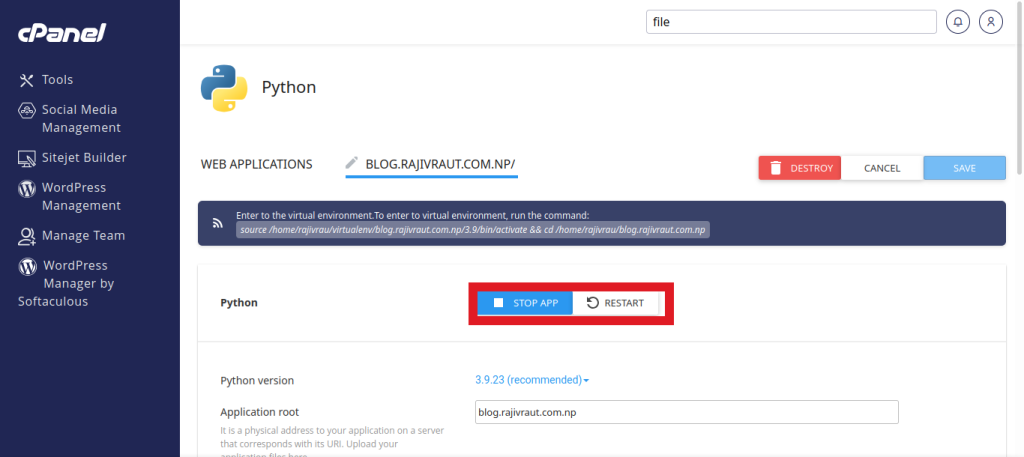
Whenever you make changes to your application’s source code, dependencies, or environment variables, restart the application from the Setup Python App interface to apply the changes.
Access the Python Application
Your Python application has now been successfully deployed in cPanel. You can access it by visiting the configured Application URL in your web browser.
If you make any changes to your application’s configuration, click the Save button to apply them. Use the Back link or Cancel button only if you want to discard any unsaved changes, as all unsaved modifications will be lost.
Note: If you are using Cloudflare and have enabled the proxy for your primary domain, ensure that your subdomain also has the appropriate A or CNAME DNS record pointing to your hosting server. Additionally, allow sufficient time for DNS propagation if the record was recently created or modified before attempting to access your application.
Managing the Application
From the Python Application interface, you can fully control your Python Application through action buttons available for each deployed application.
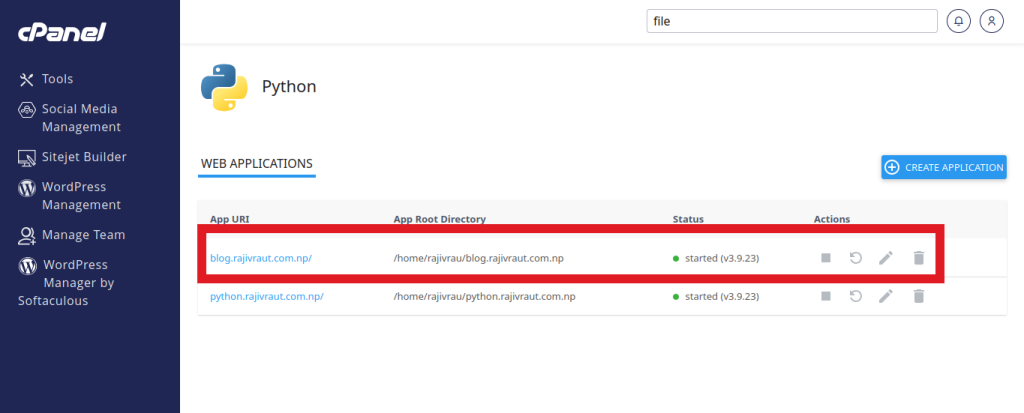
You can hover your cursor over the action buttons which will show a tooltip describing its function.
A Note on the Auto-Generated .htaccess File
When you create a Python application through cPanel, Passenger automatically generates an .htaccess file in your application’s document root. This file contains the Apache and Passenger directives required to route incoming requests to your Python application. Without this file, requests will not reach your application, resulting in deployment failures.
Avoid manually editing or replacing this file unless you are familiar with Passenger’s configuration and routing directives. Common mistakes that can break your deployment include:
- Deleting or overwriting the .htaccess file while uploading or extracting project files.
- Adding custom Apache directives that conflict with Passenger’s configuration.
- Replacing the generated .htaccess file with one copied from another project (such as a PHP application or a static website).
If your application suddenly begins returning 404 Not Found or 500 Internal Server Error responses after uploading or modifying files, first verify that the .htaccess file is still present and has not been altered before investigating other possible causes.
Best Practices
- Use the latest stable version of Python that is supported by your hosting provider, and keep your project dependencies up to date.
- Do not upload your project’s virtual environment (such as venv or .venv). Upload only your application files and install the required dependencies on the server using the Run Pip Install button or by running pip install -r requirements.txt from the application’s virtual environment.
- Store sensitive information, such as database credentials, API keys, and secret keys, using environment variables instead of hardcoding them into your source code.
- Whenever possible, keep your application outside the public web directory to help protect your source code and configuration files from accidental exposure.
- Restart the application after updating your source code, modifying environment variables, or installing new dependencies to ensure the changes take effect.
- Review the stderr.log file whenever your application fails to start or behaves unexpectedly, as it typically contains detailed error messages and stack traces that help identify the root cause of the issue.
Troubleshooting Common Python Deployment Issues
Run Pip Install Button is Disabled
Possible Causes
- The requirements.txt file is missing.
- The requirements.txt file is not located in the configured Application Root.
- The Python application has not been created successfully.
Solution
- Verify that the requirements.txt file exists in the configured Application Root.
- Ensure that the Application Root specified in cPanel points to the correct project directory.
- If the Run Pip Install button remains disabled, activate the application’s virtual environment through the Terminal and manually install the required dependencies.
- cd /home/username/application_root
- pip install -r requirements.txt
requirements.txt Not Detected
Possible Causes
- The requirements.txt file is located inside a nested directory instead of the configured Application Root.
- The Application Root is configured incorrectly.
- The file is named incorrectly (for example, Requirements.txt instead of requirements.txt).
Solution
- Move the requirements.txt file to the configured Application Root.
- Verify that the filename is exactly:
- requirements.txt
- Restart or recreate the application after correcting the file location.
503 Service Unavailable
Possible Causes
- The application is stopped.
- The passenger_wsgi.py file is missing or configured incorrectly.
- The application crashed during startup.
- Required Python dependencies are missing.
Solution
- Verify that the application is running in Setup Python App.
- Ensure that the passenger_wsgi.py file correctly imports and exposes your WSGI application.
- Install the required dependencies by running:
- pip install -r requirements.txt
- Review the application’s stderr.log file for detailed error messages and stack traces.
Application Won’t Start
Possible Causes
- Python syntax errors.
- Missing Python dependencies.
- Incorrect passenger_wsgi.py configuration.
- Import errors or runtime exceptions during application initialization.
Solution
- Install all required dependencies by running:
- pip install -r requirements.txt
- Verify that the passenger_wsgi.py file is configured correctly.
- Review the stderr.log file to identify the exact error.
- Correct the issue and restart the application from Setup Python App.
ModuleNotFoundError
Example
ModuleNotFoundError: No module named 'flask'
Possible Causes
- The required Python package has not been installed.
- The application’s virtual environment is missing the required package.
- The package is not listed in the requirements.txt file.
Solution
Install the required dependencies by running:
pip install -r requirements.txtIf the required package is missing from requirements.txt, install it manually. For example:
pip install flaskAfter successfully installing the package, update your requirements.txt file (if necessary) and restart the application.
WSGI Import Error
Example
ImportError: cannot import name 'app'or
ModuleNotFoundError: No module named 'app'Possible Causes
- The passenger_wsgi.py file imports the wrong module or application object.
- The application’s entry point has been renamed.
- The application’s directory structure has changed.
Solution
- Verify that passenger_wsgi.py imports the correct module and exposes the WSGI application as application.
- Ensure that the module and application object names match your project’s structure.
- Review the stderr.log file for the complete traceback.
- Restart the application after making the necessary corrections.
Missing Environment Variables
Symptoms
- Database connection failures.
- Authentication errors.
- API keys reported as missing.
- Secret keys or configuration values not found.
Possible Causes
- Required environment variables have not been configured.
- Variables were added to a .env file but were not loaded by the application.
- The environment variable names do not match those referenced in the application’s source code.
Solution
- Add the required environment variables using the Add Variable option in the Setup Python App interface.
- Verify that the variable names exactly match those used in your application’s source code.
- If your application relies on a .env file, ensure it is loaded correctly using a package such as python-dotenv, if applicable.
- Restart the application after adding or modifying any environment variables.
Blank Page After Deployment
Possible Causes
- The application failed to start.
- The Application URL is configured incorrectly.
- The application crashed immediately after startup.
- An exception occurred while processing the request.
Solution
- Verify that the application is running in Setup Python App.
- Confirm that the Application URL is configured correctly.
- Review the application’s stderr.log file for runtime errors and stack traces.
- Correct any reported errors and restart the application.
Cloudflare SSL or Connection Issues
Symptoms
- SSL errors
- Infinite redirect loops
- “Too Many Redirects” error
- Connection timeout
Possible Causes
- Incorrect SSL mode configured in Cloudflare.
- Missing or incorrect DNS records.
- An SSL certificate is not installed on the hosting server.
Solution
- Ensure that your domain or subdomain has a valid SSL certificate installed on the hosting server.
- In Cloudflare, use Full (Strict) SSL mode whenever a valid SSL certificate is installed on the origin server.
- Verify that the subdomain’s A or CNAME record points to the correct hosting server.
- Allow sufficient time for DNS propagation if the DNS records were recently modified.
Application Starts but Immediately Stops
Possible Causes
- Unhandled Python exceptions.
- Missing or incorrect application configuration.
- An error in the passenger_wsgi.py file.
- Required services (such as a database or external API) are unavailable.
Solution
- Review the stderr.log file to identify the exact error.
- Verify that all required environment variables have been configured correctly.
- Ensure that the passenger_wsgi.py file correctly imports and exposes your WSGI application.
- Confirm that external services, such as databases or APIs, are accessible.
- Correct the reported issue and restart the application.
404 or 500 Errors After Working Previously
Possible Causes
- The Passenger-generated .htaccess file was deleted, overwritten, or manually modified.
- A file upload or ZIP extraction accidentally replaced the .htaccess file.
- File or directory permissions within the application have been changed.
Solution
- Verify that the .htaccess file still exists in the application’s document root.
- If the file is missing or has been modified, recreate the application through Setup Python App (or restore the original file) to regenerate the required Passenger configuration.
- Avoid extracting ZIP archives directly into the application’s document root if the archive contains its own .htaccess file. Instead, extract the archive in a separate location and copy only the required project files.
pip install Fails
Possible Causes
- An unsupported or incompatible Python version is selected.
- One or more packages listed in requirements.txt are incompatible with the selected Python version.
- Some packages require system libraries or build tools that are not available on the hosting server.
- Network connectivity issues prevented the packages from being downloaded.
Solution
- Verify that the selected Python version is compatible with your application and its dependencies.
- Review the installation output to identify the package that caused the installation to fail.
- Ensure that the requirements.txt file contains only supported and compatible package versions.
- Try installing the failing package manually from the Terminal after activating the application’s virtual environment to obtain more detailed error messages.
Viewing Application Logs
If your Python application does not behave as expected, reviewing the application logs is often the quickest way to identify the root cause of the problem.
- stderr.log — Contains runtime errors, Python exceptions, stack traces, import errors, and other diagnostic information generated while the application is running. This is the first log you should check whenever your application fails to start or encounters an error.
- stdout.log (if available) — Contains the application’s standard output, such as messages printed using print() or output written to the standard output stream. Depending on your hosting provider’s configuration, this log file may not always be present.
These log files are typically located within your application’s directory and can also be viewed through the Terminal in cPanel.
Note: Always review the application logs before modifying your application’s configuration or source code. In most cases, the logs provide detailed information about why the application failed to start, stopped unexpectedly, or returned an error, making troubleshooting significantly easier.