
Table of Contents
Introduction
Node.js is one of the most widely used runtime environments for building fast, scalable, and efficient web applications. As a hosting provider, we now offer full Node.js support directly through cPanel, enabling developers to deploy and manage applications without the need for a dedicated server or VPS.
Note: If you are deploying a resource-intensive Node.js application, we strongly recommend using a VPS (Virtual Private Server). VPS hosting provides dedicated resources, greater control, and improved performance for applications with higher CPU or memory requirements.
In this guide, you will learn how to set up a Node.js application in cPanel, understand the purpose of each configuration option, and troubleshoot common deployment issues.
Prerequisites
Before deploying your application, ensure you have the following:
- A hosting account with Node.js support enabled
- Access to cPanel
- SSH access (recommended for advanced users)
- A Node.js application ready for deployment
- A valid package.json file
- A package-lock.json file (recommended for dependency consistency)
- Internet access to install required dependencies
How Node.js Works in cPanel
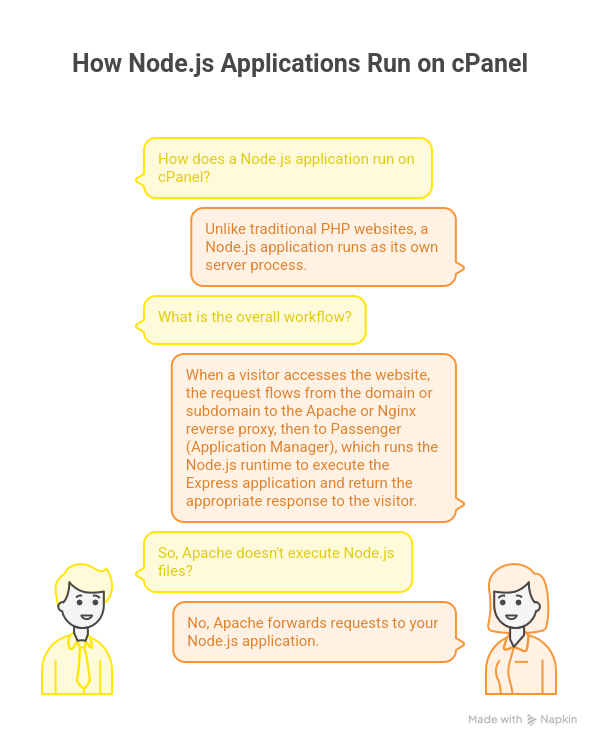
Unlike traditional PHP-based websites, a Node.js application runs as an independent server process. In cPanel, the Node.js application is launched and managed by the hosting environment, allowing it to continuously run and handle incoming requests.
When a visitor accesses your website, the request is routed through the web server (Apache or Nginx), then forwarded to the Node.js application process, which processes the request and returns the appropriate response.
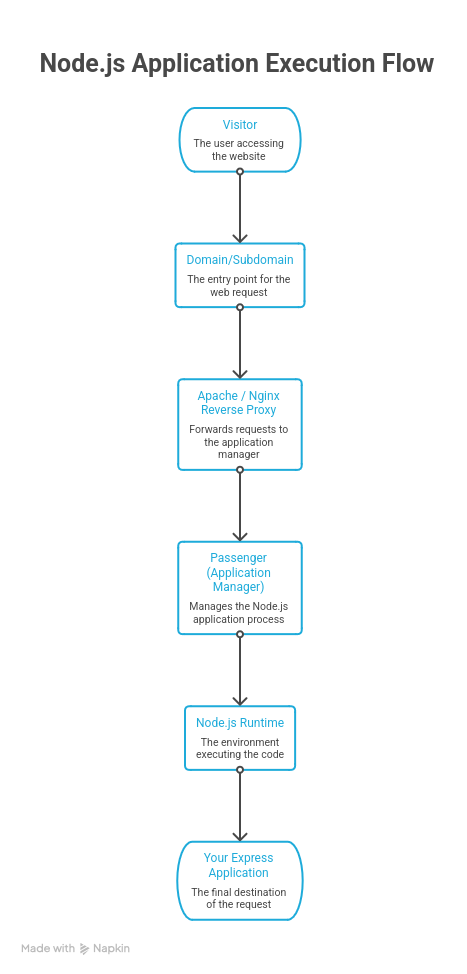
Below is an illustration that shows how a Node.js application is executed in cPanel and how the request flow works within the hosting architecture.
Execution Flow of Node.js Application in cPanel
Node.js applications deployed in cPanel follow a managed execution model where the hosting environment handles routing, process management, and runtime execution. This allows Node.js applications to run continuously without requiring manual server management.
When a visitor accesses your website, the request is first received by the domain or subdomain. It is then processed by the web server (Apache or Nginx), which acts as a reverse proxy. The request is subsequently forwarded to Passenger (Application Manager), which is responsible for managing Node.js application processes within the cPanel environment.
Passenger initializes or routes the request to the appropriate Node.js runtime based on the configured application settings. The Node.js application then executes the required logic, processes the request, and generates a response. This response is sent back through the same pipeline and delivered to the user’s browser.
Deployment Steps
Create a Subdomain (Recommended)
Although a Node.js application can be deployed on the main domain, it is strongly recommended to use a subdomain. This helps keep your application files organized and separates your application environment from the primary website.
Example subdomains:
- node.example.com
- api.example.com
Using subdomains is a common practice for APIs, backend services, and separate application modules.
To create a subdomain, follow the steps below:
Log in to cPanel
Access your cPanel account using any of the following URLs:
- cpanel.example.com
- example.com/cpanel
- example.com:2083
Note: If you are using Cloudflare and your domain’s A or CNAME records are set to proxied (orange cloud), you may not be able to access cPanel through example.com/cpanel or example.com:2083. This happens because requests are routed through Cloudflare’s proxy instead of directly reaching your hosting server. In such cases, use the direct cPanel URL provided by your hosting provider.
Navigate to Domains
After logging in to cPanel, locate the Domains section. You can find it under the Domains group or by using the search bar and typing “Domains”.
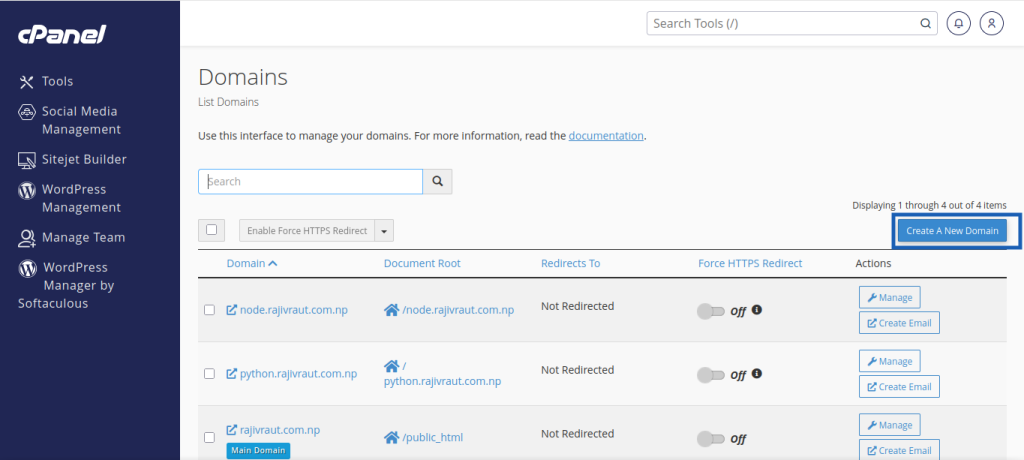
Click on Domains to open the domain management interface, as shown below.
Create a New Domain (Subdomain Setup)
After navigating to the Domains page, you will be redirected to the domain management interface.
On this page, click on the Create a New Domain button (highlighted in the interface below). This action will open the Create a New Domain configuration page, where you can define and set up your subdomain.
Configure the Subdomain
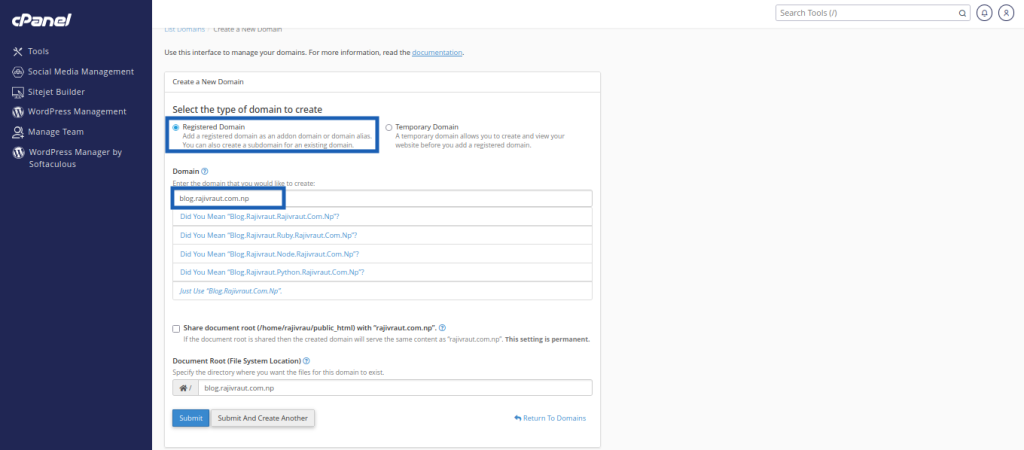
After opening the Create a New Domain page, you will need to configure your subdomain settings.
First, select the Registered Domain option if your domain is already connected to your cPanel account. If your domain is not yet connected, you may choose the Temporary Domain option for testing purposes.
Note: The Temporary Domain option should only be used for testing or development purposes. It is not recommended for production or live hosting environments.
Next, perform the following steps:
- Enter your desired subdomain in the provided field.
Example: blog.example.com, node.example.com, etc. - Select the document root for your subdomain. This defines where your website files will be stored on the server.
- You will also see an option (checkbox) to share the document root with the primary domain’s public_html directory. If selected, your subdomain will use the same file directory as your main domain.
- If you prefer to keep your subdomain files separate (recommended), leave this checkbox unchecked.
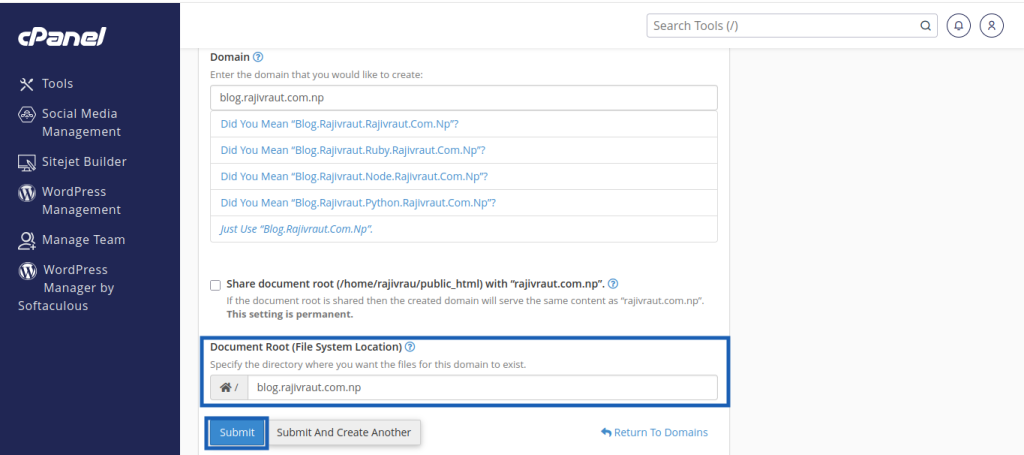
Note: If you do not enable the “share document root” option, cPanel will automatically assign a separate document root for your subdomain. You may keep the default path as it is, or modify it if required.
Submit and Complete Subdomain Creation
Finally, click on the Submit button (as highlighted in the interface below) to complete the process.
Once submitted, cPanel will process your request and create the subdomain with the specified configuration. After successful creation, your subdomain will be active and ready to use for hosting your Node.js application or any other web content.
At this point, you have successfully added a subdomain to your cPanel account.
Upload Your Project
After creating your subdomain, the next step is to upload your Node.js project files to the server. You can use any of the following methods depending on your preference and workflow:
- cPanel File Manager (recommended for beginners)
- FTP (File Transfer Protocol)
- WebDisk
- Git deployment
For demonstration purposes, we will use cPanel File Manager, as it is the simplest and most widely used method. However, you are free to choose any method based on your requirements.
Open File Manager
Search for File Manager using the cPanel search bar. Click on it to open the File Manager interface.
Once opened, you will be redirected to the file management dashboard where all your hosting files and directories are available.
Navigate to Subdomain Directory and Upload Files
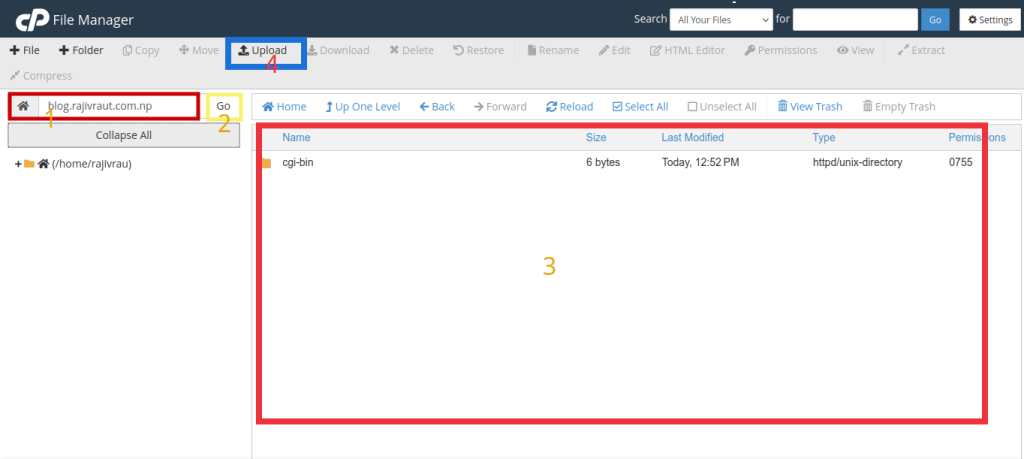
In the File Manager, use the search or directory tree to locate your subdomain folder. Enter your subdomain name in the search field and click Go.
This will open the document root directory of your subdomain on the right-hand side of the screen.
At the top of the interface, you will see the Upload button. Click on it to proceed.
You will then be redirected to the upload interface, where you can upload your project files.
Upload Project Files
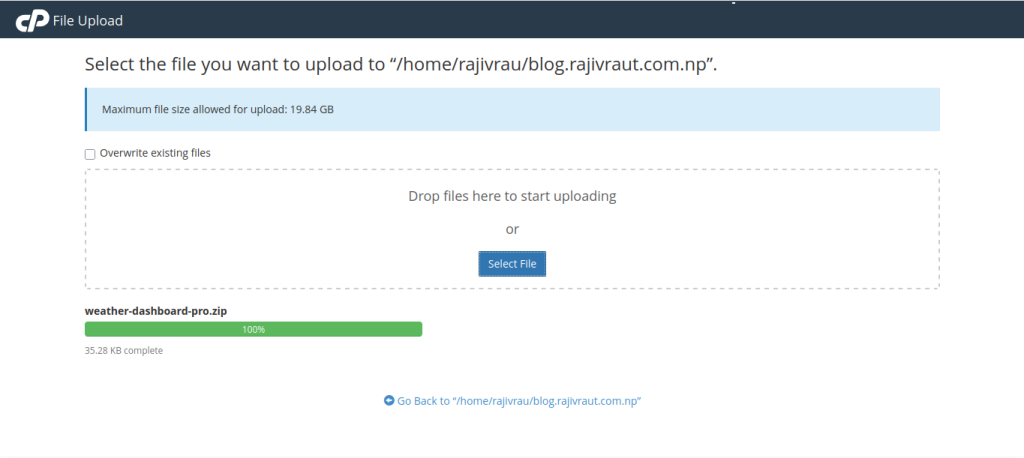
In the upload interface, click on the Select File button. You will be prompted to choose your project files from your local system. You may upload individual files or directly upload a compressed ZIP file of your entire project for convenience.
Once the upload is successfully completed, click on the “Go Back to ‘/home/hostname/subdomain’” button. This will redirect you back to your subdomain’s document root directory in the File Manager.
At this point, your project files will be available in the server directory and ready for further setup or deployment steps.
Extract Uploaded Project Files
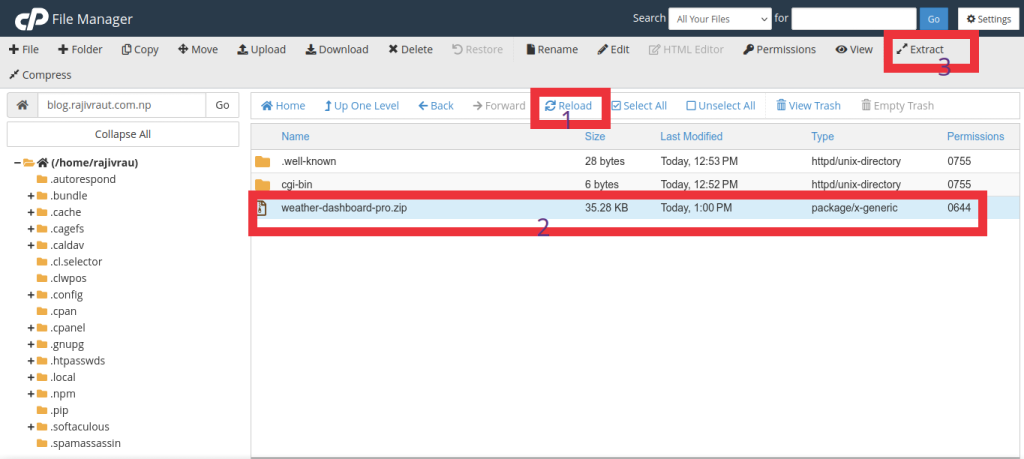
After returning to your subdomain’s document root directory, you may not immediately see the uploaded project files. This is normal behavior in cPanel and does not indicate any issue.
If the uploaded file is not visible, simply click on the Reload button. The file manager will refresh, and your uploaded ZIP file should now appear in the directory.
Next, select your uploaded project ZIP file with a single click, and then click on the Extract option from the top toolbar. This will unpack the contents of your project into the current directory.
Once extraction is complete, your project files will be ready for configuration and deployment.
Clean Up Uploaded ZIP File
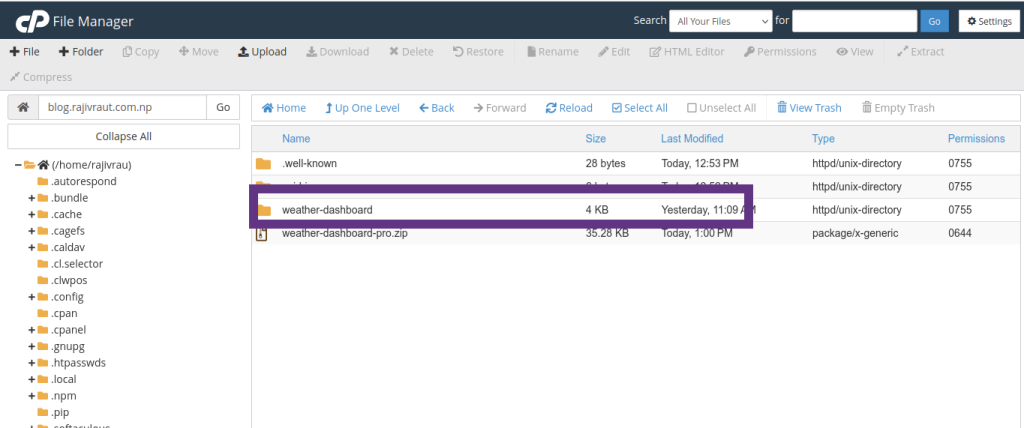
After successfully extracting the ZIP file, your project directory will be created in the subdomain’s document root.
At this stage, the extracted project files are ready for use, and the original ZIP file is no longer required. If needed, you can select the ZIP file and click the Delete button from the toolbar to remove it and free up storage space.
This step is optional but recommended to keep your file structure clean and organized.
Move Project Files to Subdomain Root Directory
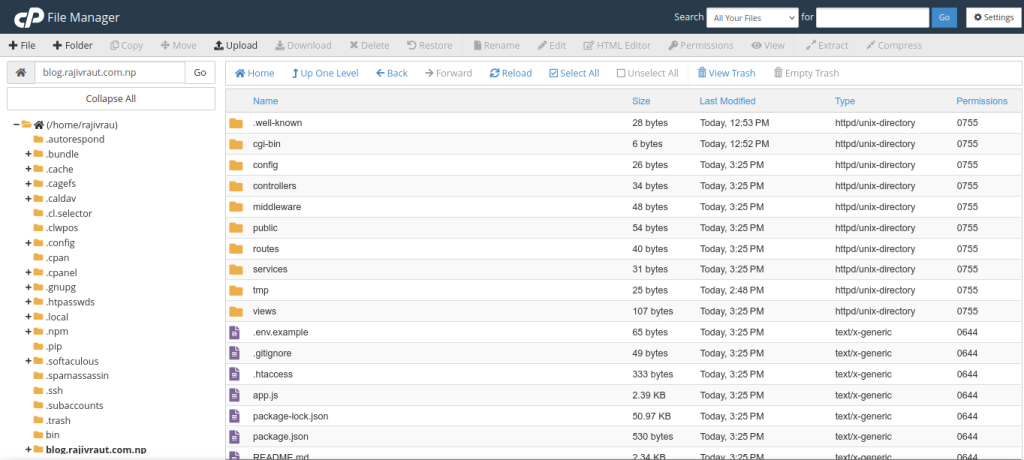
Next, open your project directory inside the File Manager.
Click on the Select All button to highlight all files and folders within the project directory. Once selected, click on the Move option from the toolbar. This will open a dialog box where you can specify the destination path.
In the destination field, enter your subdomain’s root directory path.
Example:
subdomain.example.com/
After entering the correct path, click on the Move Files button to complete the process.
Once the move operation is finished, all project files will be placed directly inside the root directory of your subdomain, making them accessible for deployment and execution.
Setting up the Node.js Application
Open Node.js Application Setup
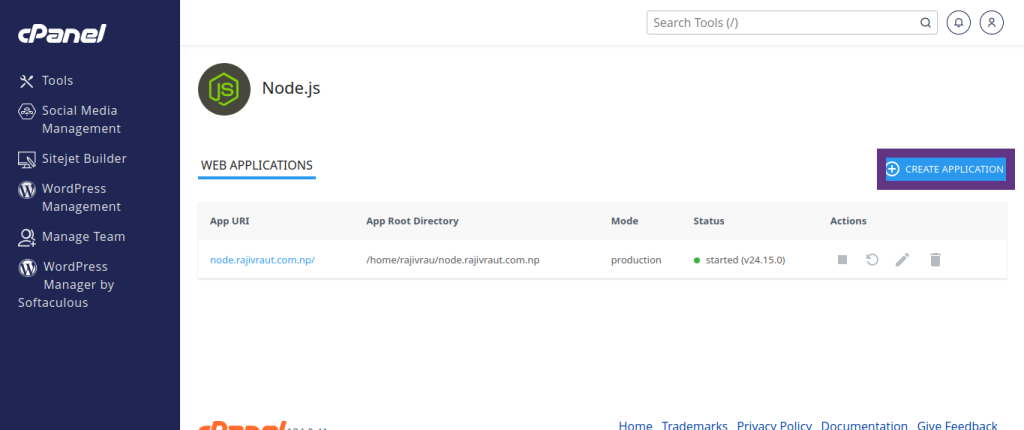
Navigate to the Setup Node.js Application option under the Software section in cPanel. Alternatively, you can use the cPanel search bar and directly search for Node.js Application to access the tool.
Create a New Node.js Application
Inside the Node.js Application interface, you will find two main sections:
- Create Application
- Existing Node.js Applications (which displays already created applications along with details such as App URI, mode, status, and available actions)
To create a new Node.js application, click on the Create Application button (as highlighted in the interface). This will redirect you to the Create Node.js Application setup page, where you can configure your new application.
Configure the Node.js Application
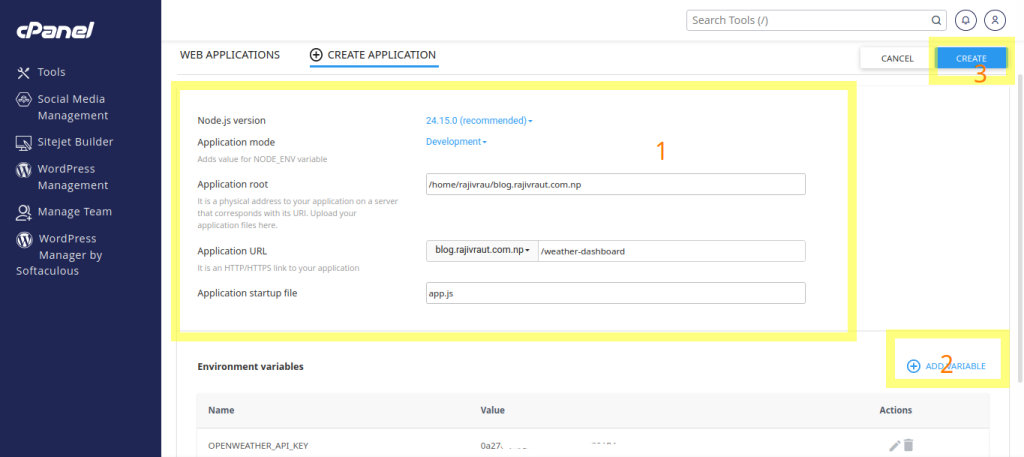
In the Create Node.js Application interface, you must provide all required configuration details in their respective fields to properly set up your application.
- Node.js Version: Select the required Node.js runtime version for your project. It is recommended to use an LTS (Long-Term Support) version for better stability and long-term compatibility. You will notice a Recommended label next to supported LTS versions in the dropdown list.
- Application Mode: Choose the appropriate mode based on your usage:
- Development Mode – Used during development and testing
- Production Mode – Used for live and optimized applications
- Application Root: Specify the directory where your Node.js application files are located.
Although the application can be placed inside the subdomain’s document root, it is generally recommended to keep it outside the public web directory for better security. For example:
/home/username/nodeapp
/home/username/apps/blog
Keeping the application outside the public directory helps protect sensitive files such as .env, package.json, and configuration files from accidental exposure due to misconfiguration.
- Application URL: This section allows you to define the URL where your application will be accessible. It includes:
- A dropdown list of all connected domains and subdomains
- A text field to specify the URL path
Example:
blog.example.com/node
In this case:
- Select blog.example.com from the dropdown
- Enter /node in the adjacent field
Note: For beginners, placing the application inside the subdomain’s document root may simplify deployment and understanding. However, for better security and production-grade architecture, it is recommended to store the application outside the public web directory and map it using the Application URL configuration.
- Application Startup File: This field defines the entry point of your Node.js application. Common startup file names include:
- server.js
- app.js
- index.js
Sample Startup File Code
const express = require("express");

const app = express();

const PORT = process.env.PORT || 3000;

app.listen(PORT, () => {

   console.log("Server started");

});
Important Note on Port Usage
The application uses:
process.env.PORTThis is essential because cPanel (via Passenger) automatically assigns an available port for your Node.js application. Therefore, you must never hardcode a port number such as 3000 in production environments.
Environment Variables Configuration
cPanel Node.js Application Manager does not automatically load variables from a .env file. Instead, environment variables must be defined manually using the interface.
To add environment variables:
Click on the Add Variable button
Enter the required details:
- Name: The variable key (must match your code)
- Value: The corresponding value
Click Done to save the variable
Repeat this process for each required environment variable.
Final Step: Create Application
After completing all configurations, click on the Create button. cPanel will then initialize and deploy your Node.js application.
Once created successfully, your application will appear in the Node.js Application Manager, where you can manage its status, logs, and runtime settings.
Install Dependencies (Run NPM Install)
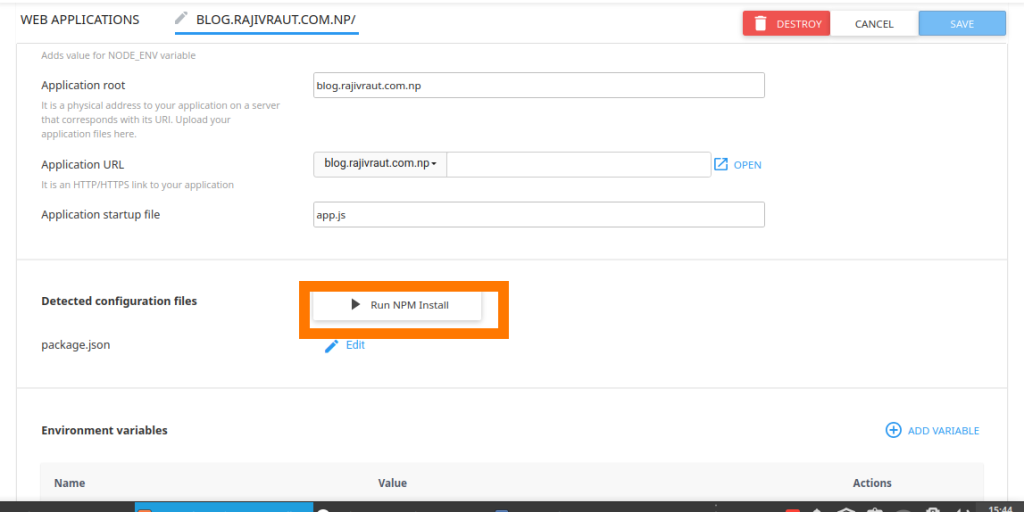
After successfully creating the Node.js application, you will notice that the Run NPM Install button becomes enabled. This option is only activated if cPanel detects a valid package.json file in your application root directory.
Click on the Run NPM Install button to automatically install all required dependencies listed in your package.json file.
During this process, cPanel will execute npm install in the background and download all necessary packages for your application to function correctly.
Once the installation is complete, your Node.js application will be fully equipped with its required dependencies and ready for further configuration or deployment steps.
Note (For Advanced Users Only)
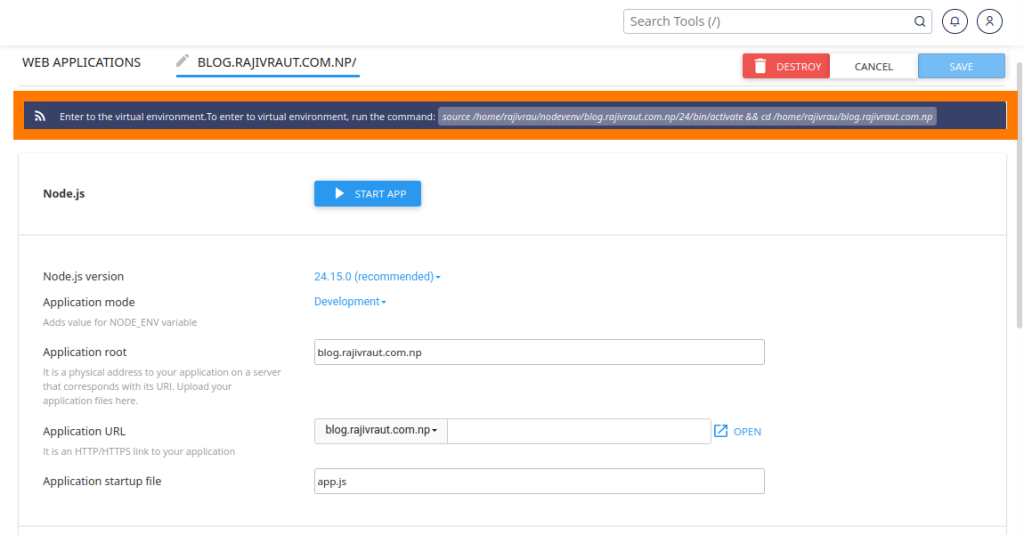
If cPanel does not automatically detect the package.json file, it may provide a command to access the virtual environment (or application environment) of your Node.js setup.
Advanced users can use this command to manually enter the application’s environment and run installation commands such as npm install directly.
This approach is useful when:
- The Run NPM Install button is unavailable or not functioning
- Dependencies need to be installed manually via terminal/SSH
- Additional debugging or custom installation steps are required
Once inside the environment, you can manually execute dependency installation and other Node.js commands as needed for your application setup.
Manual Installation via Terminal (Advanced Method)
You can copy the provided command and open the cPanel Terminal. Paste the command into the terminal to enter the subdomain’s virtual environment.
Once inside the environment, navigate to your subdomain’s application root directory.
After reaching the correct directory, you can manually execute the following command:
npm installThis will install all dependencies defined in your package.json file.
This method is particularly useful when automatic installation through the Run NPM Install button is unavailable or when you need more control over the installation process.
Start the Node.js Application
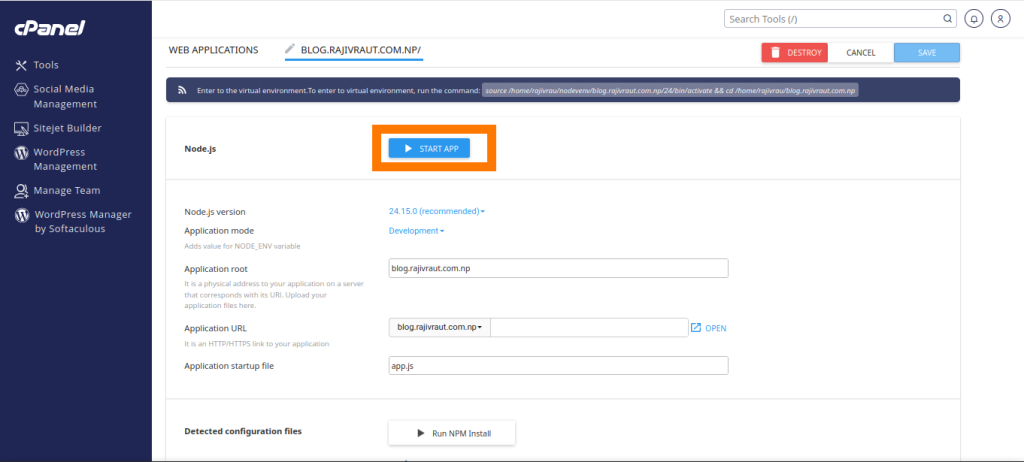
After the package installation is successfully completed, click on the Start button to launch your Node.js application.
cPanel will initialize the application using the configured settings, start the Node.js runtime process, and make your application active and accessible through the assigned Application URL.
Once started, you can verify the status of your application from the Node.js Application Manager, where it will appear as running along with its process details and logs.
Run the JavaScript Script
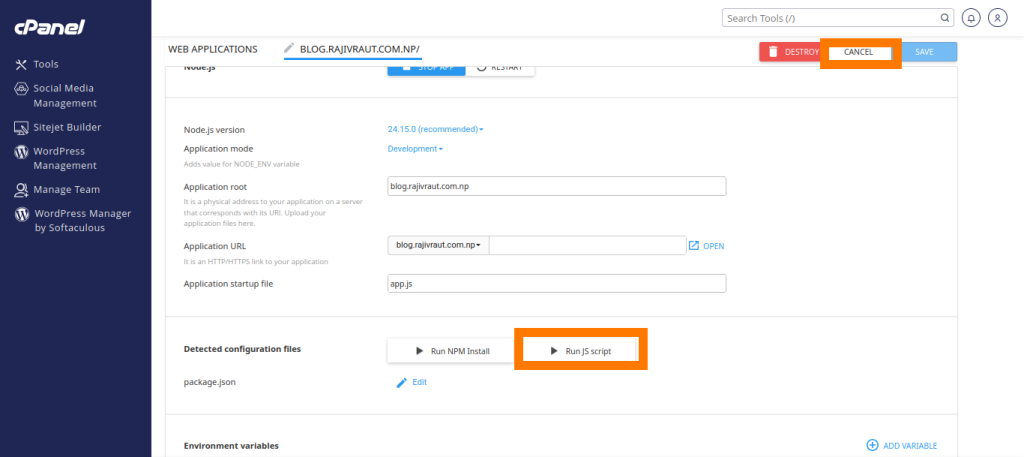
After the application has been successfully started, click on the Run JS Script button. This will open a dialog box where you can select the available script to execute.
From the list, choose the appropriate script (for example, start or dev) depending on your application configuration.
Once selected, click on the Run JS Script button again to execute the chosen script. cPanel will then run the script using the configured Node.js environment and display the output or execution status accordingly.
Deployment Completion and Accessing the Application
At this stage, your Node.js application has been successfully deployed in cPanel. You can now access it by visiting the configured Application URL (URI) directly in your web browser.
Saving Changes
Click on the Save button to apply and persist all configuration changes.
Use the Back or Cancel options only if you wish to discard unsaved changes. Any unsaved configuration will be lost and will need to be reconfigured.
Important Note on Cloudflare Configuration
If you are using Cloudflare with proxy enabled (orange cloud) for your main domain, ensure that your subdomain has a proper DNS record configured:
- A Record or CNAME Record must point to your hosting server
This ensures that requests are correctly routed to your cPanel hosting environment and your Node.js application is accessible without issues.
Managing the Node.js Application
From the Node.js Application interface, you can fully manage your deployed Node.js application using the available action buttons provided for each application instance.
These controls allow you to perform essential operations such as starting, stopping, restarting, and modifying the application without requiring direct server-level intervention. This makes application management simpler and more efficient directly from cPanel.
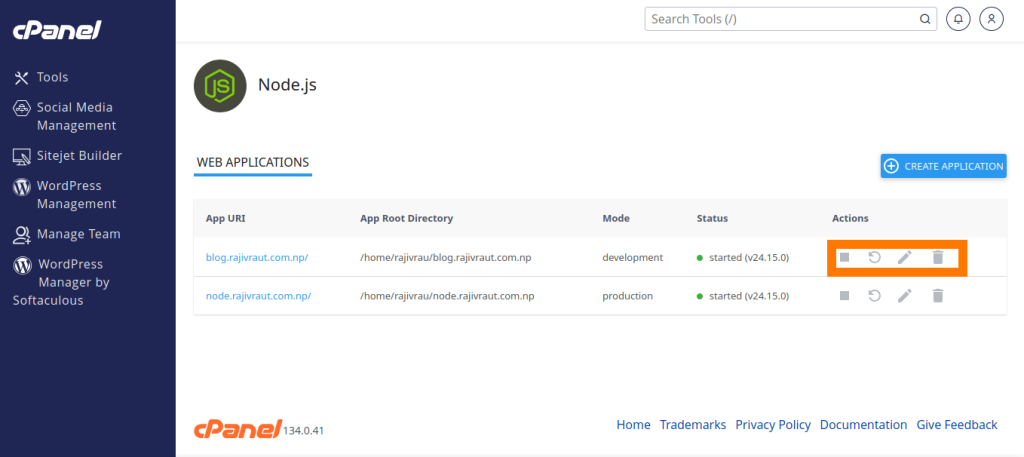
You can hover your cursor over each action button in the Node.js Application Manager to view a tooltip. This tooltip provides a brief description of the button’s function, helping you understand its purpose before performing any action.
Note on the Auto-Generated .htaccess File
When a Node.js application is created through cPanel, Passenger automatically generates an .htaccess file in the application’s root directory. This file contains essential routing rules that ensure incoming requests are correctly forwarded to the Node.js application via Passenger.
Without this file, web requests will not reach your application, and it may stop functioning as expected.
Important Guidelines
It is strongly recommended not to manually edit this file unless you fully understand Passenger’s routing configuration.
Common mistakes that can break your deployment include:
- Accidentally overwriting or deleting the .htaccess file during file uploads or ZIP extraction
- Adding custom Apache directives that conflict with Passenger’s routing rules
- Copying an .htaccess file from another project (such as PHP or static websites) into the Node.js application root.
Best Practices for Node.js Deployment in cPanel
To ensure a stable, secure, and maintainable Node.js application in cPanel, follow these recommended best practices:
- Use the latest LTS version of Node.js for better stability, performance, and long-term support.
- Keep all project dependencies up to date to avoid security vulnerabilities and compatibility issues.
- Do not upload the node_modules directory. Instead, upload only your project files and run npm install on the server to install dependencies.
- Store sensitive information such as API keys, database credentials, and secrets using environment variables instead of hardcoding them in your source code.
- Keep your application outside the public web directory whenever possible to enhance security and prevent accidental exposure of sensitive files.
- Restart the application after making changes to code or environment variables to ensure updates are properly applied.
- Regularly check the stderr.log file whenever your application fails to start, as it contains important error details for debugging.
Troubleshooting common Node.js Deployment issues
Run NPM Install Button is Disabled
Possible Causes
- package.json file is missing.
- package.json is not located in the configured Application Root.
- The application has not been created successfully.
Solution
- Verify that the package.json file exists in the configured Application Root.
- Ensure the Application Root in cPanel points to the correct project directory.
- If the button remains disabled, activate the application’s virtual environment through Terminal and manually install the dependencies.
cd /home/username/application_root

npm install
package.json Not Detected
Possible Causes
- The file is located inside a nested directory.
- The Application Root is incorrect.
- The file is named incorrectly (for example, Package.json instead of package.json).
Solution
- Move package.json to the configured Application Root.
- Verify the filename is exactly: package.json
- Recreate or restart the application after correcting the location.
503 Service Unavailable
Possible Causes
- The application is stopped.
- The startup file is incorrect.
- The application crashed during startup.
- Required dependencies are missing.
Solution
- Verify the application status in Setup Node.js App.
- Ensure the correct startup file (such as app.js, server.js, or index.js) is configured.
- Run:
npm install- Review the application’s stderr.log for detailed error messages.
Application Won’t Start
Possible Causes
- JavaScript syntax errors.
- Missing dependencies.
- Incorrect startup file.
- Runtime errors during initialization.
Solution
- Install all dependencies:
npm install- Verify the startup file configured in cPanel.
- Review stderr.log for the exact error.
- Restart the application after making corrections.
Cannot Find Module Error
Example:
Error: Cannot find module 'express'
Possible Causes
- Required packages have not been installed.
- node_modules is incomplete.
- package.json is missing the dependency.
Solution
Run:
npm installIf the dependency is missing from package.json, install it first.
npm install express Restart the application afterwards.
Port Already in Use
Cause
The application is attempting to use a fixed port such as:
app.listen(3000);cPanel automatically assigns an available port through Passenger.
Solution
Always use:
const PORT = process.env.PORT || 3000;

app.listen(PORT);
Avoid hardcoding the port number when deploying to cPanel.
Missing Environment Variables
Symptoms
- Database connection failures
- Authentication errors
- API keys reported as missing
Possible Causes
- Required environment variables have not been configured.
- Variables were added to a .env file but not loaded by the application.
Solution
- Add environment variables using the Add Variable option in the Node.js Application interface.
- Verify that the variable names exactly match those referenced in your application.
- Restart the application after adding or modifying environment variables.
Blank Page After Deployment
Possible Causes
- The application failed to start.
- The request is routed to the wrong directory.
- The application crashed immediately after startup.
Solution
- Verify the application is running.
- Confirm that the Application URI is configured correctly.
- Review the application’s log files (stderr.log and stdout.log) for runtime errors.
- Restart the application after correcting any issues.
Cloudflare SSL or Connection Issues
Symptoms
- SSL errors
- Infinite redirect loops
- “Too Many Redirects”
- Connection timeout
Possible Causes
- Incorrect SSL mode in Cloudflare.
- Missing DNS records.
- SSL certificate not installed on the hosting server.
Solution
- Ensure your domain or subdomain has a valid SSL certificate installed.
- In Cloudflare, use Full (Strict) SSL mode whenever a valid certificate is installed on the origin server.
- Verify that the subdomain’s DNS record (A or CNAME) points to the correct hosting server.
- Allow time for DNS propagation if records were recently modified.
Application Starts but Immediately Stops
Possible Causes
- Unhandled exceptions.
- Missing configuration.
- The startup script exits immediately.
- Required services (such as a database) are unavailable.
Solution
- Review stderr.log for the exact error.
- Verify all required environment variables are configured.
- Ensure the startup file keeps the server running by listening on process.env.PORT.
- Confirm that external services (such as databases or APIs) are accessible.
404 or 500 Errors After Working Previously
Possible Causes
- The Passenger-generated .htaccess file was deleted, overwritten, or manually edited.
- A file upload or extraction accidentally replaced the .htaccess file.
- File permissions on the application root were changed.
Solution
- Check that an .htaccess file still exists in the application root.
- If it’s missing or was modified, recreate the application through Setup Node.js App (or restart it) to regenerate the correct Passenger routing rules.
- Avoid uploading zipped project files directly into the application root if the archive contains its own .htaccess — extract elsewhere first and merge selectively.
npm install fails
Possible Causes
- Unsupported Node.js version
- Incompatible npm version
- Native modules requiring build tools
- Network connectivity issues
Solution
- Verify the selected Node.js version is compatible with your application.
- Review the installation output for the failing package.
- Ensure package.json does not contain unsupported dependencies.
- Try installing the dependency manually through the Terminal to obtain more detailed error messages.
Viewing Application Logs
If your application does not behave as expected, reviewing the application logs is the fastest and most effective way to identify the root cause of the issue.
cPanel Node.js applications typically provide two important log files:
- stderr.log — Contains runtime errors, exceptions, and stack traces. This log is the primary source for debugging application failures.
- stdout.log — Contains standard application output, including messages from console.log() and other informational logs.
Accessing Logs
These log files can usually be accessed in one of the following ways:
- Inside your application’s directory in the File Manager
- Through the cPanel Terminal (for advanced users)
Important Note
Always review the log files before making configuration changes. In most cases, they clearly indicate the exact reason why an application failed to start or stopped unexpectedly, helping you avoid unnecessary troubleshooting steps.